


Voxel Textures
 RA2
RA2 YR
YR
|
|
|

This tutorial will show you how to get your voxels to look less bland ingame.
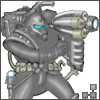
First I will use the same cube as before. Voxel section editor III V1.36 got a nice texturing tool. Simply open your voxel and click on the menu called “Tools”, you will find the texture tool under colours and normals.
Save the bmp, now open it with your favourite photo editing utility (I will use photo shop for this tutorial). As long as you got some kind of layer function you should be able to follow quite well.
Use an rectangular marguee tool to select the bland sides, skip the enhanced edges from the previous tutorial, they should stay none textured (just the sides for now). Make those into a new layer (photo shop is just right click and copy as layer). It should look like the sample image below.

Apply a texture to the shapes, try to maintain similar brightness/darkness and theme colour. I used a metallic texture from http://www.cgtextures.com
My end result for the sides of the cube turned out like this, sample below.

I am not quite satisfied with the result though, what I do to change that is to use a tool called dodge and burn. It makes things brighter (dodge) and darker (burn). I want the edges and top of the texture to be bit brighter while the bottom a bit darker. I am sure there is a similar tool in your photo editing application, it is commonly used for texturing. The result can be seen below.

Now I am going to move on to the top of the voxel, I won´t do the bottom as it will be too dark to be noticeable ingame anyway. Apply the same texture as before but keep it brighter. Once again dodge and burn but this time darker on top sides/front/back but middle brighter. Should look like this when done.

Applying the texture, remember to check that RA2 palette is selected (unless doing this for TS). Apply the texture same way you saved, just pick your texture this time. One thing you should do right after applying is to run the script that is called “no unlit colours”. Sometimes you get some pink colours, fix those manually by applying close by colours. You are now done.
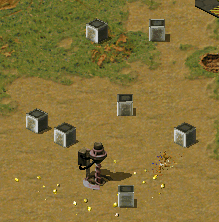
Result ingame can be seen below.
This tutorial gets harder to follow once you have more complex units, practise makes perfect though. Anyone willing to give some information about similar tool in psp, infanview and gimp? Since I do not use or have those I can´t give any instructions on those.
Voxel incase you want to take a closer look Voxel
A big thanks for helping with checking spelling goes to Blaat.
First I will use the same cube as before. Voxel section editor III V1.36 got a nice texturing tool. Simply open your voxel and click on the menu called “Tools”, you will find the texture tool under colours and normals.
Save the bmp, now open it with your favourite photo editing utility (I will use photo shop for this tutorial). As long as you got some kind of layer function you should be able to follow quite well.
Use an rectangular marguee tool to select the bland sides, skip the enhanced edges from the previous tutorial, they should stay none textured (just the sides for now). Make those into a new layer (photo shop is just right click and copy as layer). It should look like the sample image below.
Apply a texture to the shapes, try to maintain similar brightness/darkness and theme colour. I used a metallic texture from http://www.cgtextures.com
My end result for the sides of the cube turned out like this, sample below.
I am not quite satisfied with the result though, what I do to change that is to use a tool called dodge and burn. It makes things brighter (dodge) and darker (burn). I want the edges and top of the texture to be bit brighter while the bottom a bit darker. I am sure there is a similar tool in your photo editing application, it is commonly used for texturing. The result can be seen below.
Now I am going to move on to the top of the voxel, I won´t do the bottom as it will be too dark to be noticeable ingame anyway. Apply the same texture as before but keep it brighter. Once again dodge and burn but this time darker on top sides/front/back but middle brighter. Should look like this when done.
Applying the texture, remember to check that RA2 palette is selected (unless doing this for TS). Apply the texture same way you saved, just pick your texture this time. One thing you should do right after applying is to run the script that is called “no unlit colours”. Sometimes you get some pink colours, fix those manually by applying close by colours. You are now done.
Result ingame can be seen below.
This tutorial gets harder to follow once you have more complex units, practise makes perfect though. Anyone willing to give some information about similar tool in psp, infanview and gimp? Since I do not use or have those I can´t give any instructions on those.
Voxel incase you want to take a closer look Voxel
A big thanks for helping with checking spelling goes to Blaat.