


Simple Modelling Tutorial
|
|
|
|

---
Alright, i wrote this tutorial ages ago, so the english might be a bit rough and the tutorial was originally intended for use with Gmax, but it works just as well for 3d studio max, as a side-note for those using 3ds max you may skip the 1.0 - Program part, hope you learn something from it. Everything that follows from here on is unedited.
---
Introduction
This tutorial was written in a school-project where the students was supposed to learn to plan and work on something by themselves and as I like working with 3D things I decided to make a tutorial for gmax and also 3d studio max 6 for others to read if they want to get into 3D doohicky modelling, when using this tutorial, feel free to go crazy and test things (save first though).
Chapters
1 - Preparations
1.0 - Program
1.1 - Concept art
1.2 - Gmax User Interface
2 - Modelling
2.0 - Feet
2.1 - Legs and Torso
2.2 - Wings
2.3 - Neck and Head
2.4 - Beak and Eyes
1.0 - Preparations - Program
Before you can even think of starting to make any of your fantasies into reality (or well virtual reality..) you'll need a program. The program we'll be working with is Gmax, it's a free stripped down version of 3d studio max that you can download without much problems right here: http://www.turbosquid.com/gmax just click the green 'Download gmax' button up top. When you have the program installed and launch it you will see a window pop up that wants you to insert a registration key, to get one of these which also is free (of course) you will need to go to turbosquid and register a user on their website and then you will be sent the registration key through your e-mail. When you input the key in gmax the program will launch and you will get to choose your prefered graphics settings, when you've done this you are ready to go.
1.1 - Preparations - Concept Art
When creating a 3D model the easiest way is to have a reference picture of what you want to make, you can either search the net for a suitable picture or doodle something down on a paper. The more angles the better, I chose to only use one picture because I couldn't really spend any more time on doing another picture as the first one took too long to make. Here's the picture I will be using as reference.

1.2 - Preparations - Gmax/3ds max User Interface
I will go through the most commonly used toolbars and tools here and I'll start with the most basic and most used tools. See this picture.

From left to right, first button is the undo button, no need explaining that and the second one is the redo button doesn't really need any explaining either.
The third and fourth buttons are for when you want to link or unlink your model to a skeleton structure, this is only used when animating the model, so we won't be using these.
Fifth one is the selection tool, with it you can select the model piece in any of the viewports you want to tamper with.
Sixth tool is basically for if you want to select several objects you can hold down the left mouse button and just move the mouse around, with this tool you can change between if you want to have to select the entire object or just part of it to select it.
The seventh tool is for what kind of thing you want to select for instance, if you want to select all model parts and nothing else you'd select 'geometry' from the list and presto, you can now only select models (mesh).
Eighth tool is also a selection tool, basically you just click it and then you can select any part on the model you want from a list.
These last three are the mostly used ones as they involve manipulating the model's size, shape and position.
Ninth tool is the one you use to move things like models and vertices (vertexes).
Number ten is for rotating models and model pieces.
And last but certainly not least we have the resizing tool, with it you can either shrink or enlarge models.

These tools involve moving of the angle you view your model in the different viewports, the first one is the zoom, which zooms (obviously).
The second one is also a zoom, but it zooms all viewports at the same time (quite unnecessary).
The third one is the one you use if you loose track of the model because it basically snaps the camera view back to the model.
Fourth also snaps back to where the model is but with every viewport.
The fifth tool is for zooming in the 3D viewport and for zooming in on the selection you make in the other viewports.
The sixth is for moving the camera angle up and down, right and left or whatever you want.
Seventh is for circling around the model and to get a nice view of it.
Last one makes the viewport you've currently selected extend and cover the other viewports, just click it again if you want it to go back to normal.
2.0 - Modelling - Feet
Right, what we'll begin working on will be the feet, always easy to start with the feet as they most often do not have much details and weird shapes that for instance heads have. I've decided that the bird should have three toes so I'm going to start with the middle one and work from there. First I create a box with 4 length segments and 5 width and height segments. After that I right-click the box and choose
'Convert to:' -> 'Convert to Editable Poly'
A side menu should appear. Now click the first icon from the left (the one with 3 dots) under the text 'Selection'. Should be quite easy to locate.
Now you can see that dots also known as polygons appear on the box in the different viewports. You can now select them and move them as you wish to get the shape of the middle toe bit. This is what mine looks like.
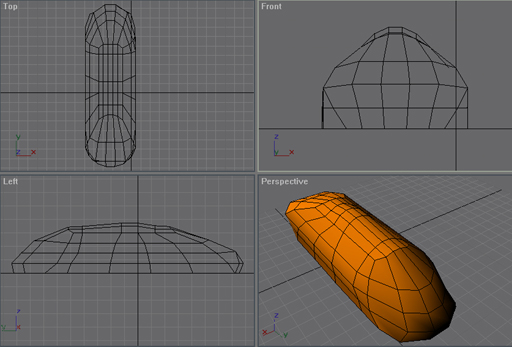
Remember that the toe you are shaping will have one toe on each side so make an area on those sides flat. When you're happy with the shape of your toe go to the side panel to the right, second tab and click the fourth icon from the left which looks like a red square once you've clicked it you should see lines all over the model in the perspective viewport, try clicking on the model. You should see that some of the lines around the spot you clicked turn red, this means you've selected them. The segments of the model are called faces.
So now select a few faces where you think the other toes should start, then go to the menu on the right and scroll down the 'selection' part until you get to the 'Edit Geometry' section here you'll find the 'Extrude' and 'Bevel' tools.
Click the Extrude button and then click and drag the selected area to any side in the viewport. This will simply make a new squareish toe appear do it a few times in the same area so you get a few segments on top of each other to work with. When this is done start shaping the toe, do this on the other side of the foot too.
Next step is to make the foot look good, I managed to make my foot look pretty good here's a pic:
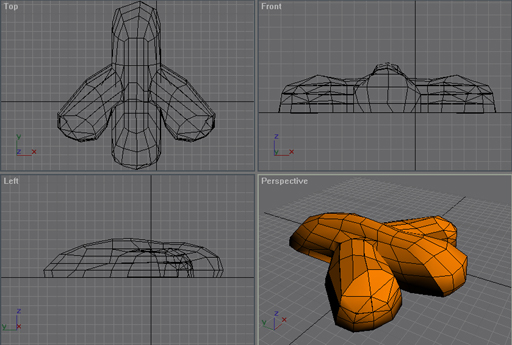
And that's the foot done, now to move on to the legs and body. Remember if you forget how to do something you can always go back and read.
2.1 - Modelling - Legs and Torso
Legs are pretty easy to do, just start by going to the 'Create' menu in the top bar and go 'Standard Primitive' and then 'Cylinder', start by putting it at a position you'd like it to be and after that go to the left menu and click the second icon from the left (the blue bent pipe or rainbow shaped thing). Then go and change the 'Sides' into a number between 6-9 if you want, I changed it to 8 and change 'Height segments' to 4-5 I changed this to 5. Now just convert to editable polygon or mesh and start moving the vertexes around to make the leg look somewhat organic. I added a knee to mine by moving a few vertexes further out than the others, like this.

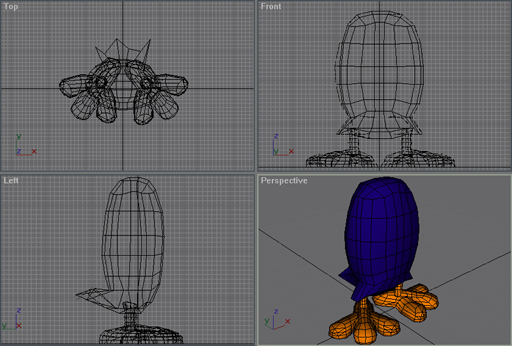
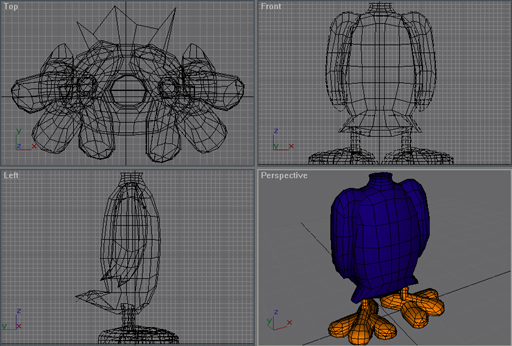
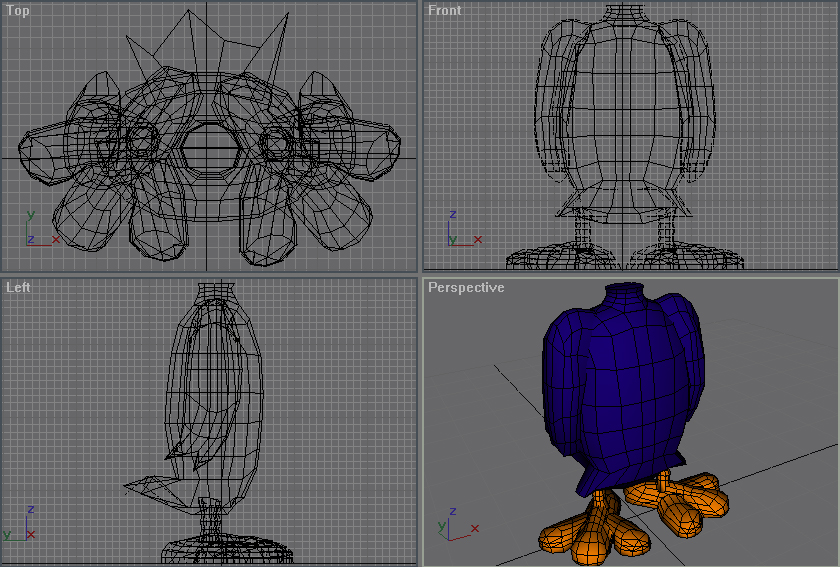
Onwards to the torso, first of all we start by creating a box and changing the 'Length segs' to 6, 'Width segs' to 5 and 'Height segs' to 5. Now we convert into editable polygon and start shaping the model like the concept drawing. Be sure to drag some vertexes far from the rest of the model to resemble feathers. Also make sure it's rounded and that you do not see any hard edges where they shouldn't be.
This is what my torso turned out like.
2.2 - Modelling - Wings
Now we're going to do the wings/arms, again we start by creating a box and changing the segment amounts to something like maybe length segs: 5, width segs: 5 and height to 3. Now we should have a nice box that we can reshape into a fine looking wing. If you haven't already then I advice you to move the box to where the wings should be, on the side of the torso, where his shoulders would be just like in the concept picture.
Now the fun bit starts and the challenge, to shape it into an actual wing instead of a box, feel free to play around with the numbers of segments. This might be a bit tricky so be sure to have a copy of the gmax file so that you can start over again if your first attempt doesn't turn out any good.
I realised that I should have made another concept of the bird but in a frontal view. Anyways, this is what my wing turned out like:
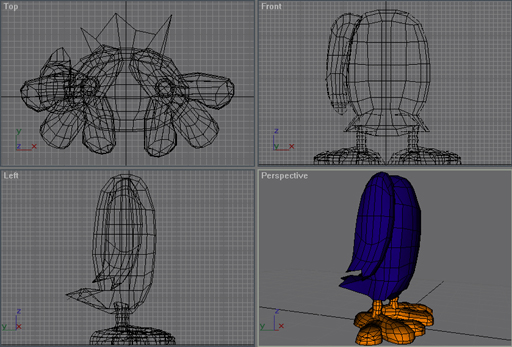
Now that you've made one wing, it's time to do the other, we'll copy the one you just made. Select your new shiny wing and go to Edit and then Clone, a 'clone options' window will now appear and make sure the 'copy' selection is marked, under the text 'Object', click OK (the copy will appear inside the other wing, same size and everything so you may not see it at first).
Now you've cloned your one wing but the copy is the wrong way, keep the wing selected and go to Tools and then Mirror, a mirror window will pop up, make sure that under Mirror Axis that the X is marked ignore the other options. Now you will see that your cloned wing has spun around on the x axis and is now perfectly mirrored
Now we will simply move the mirrored wing so that it is almost exactly on the right height and everything as the other wing.
When you've done this you've got a headless bird.
2.3 - Modelling - Neck and Head
Now we will move on to the neck that the bird will obviously need so that it can have a head.
Right let's start by making a cylinder where the neck should be, about the size you think it should be, Height segs: 4-5, sides: 8-10. Now start shaping it so that it fits in with the upper body, necks can be hard to make look good and realistic but with time you learn how to make nice looking ones.
The head is often the most detailed part of a character, which will make this the biggest challenge yet, time to hit the bricks and get started.
Right, first of all, we start making a box just like we did with the torso,
Let's say length segs: 7-8, width segs: 4-5 height segs: 6-7
After we have made the box (head) really segmented, we will start shaping it to the basic shape that we want, don't try to shape it in the perspective view, so do it in one viewport at a time, left, front, top and if you feel that it will make it easier to see what you're doing, hide the feet and wings or more if you want.
My head turned out quite good, I hope yours did too.
Here's what mine turned out like:
2.4 - Modelling - Beak and Eyes
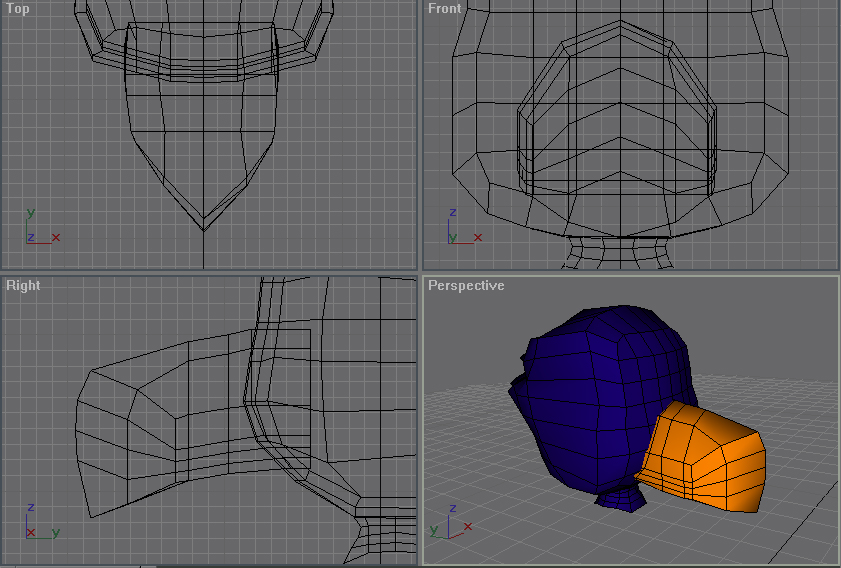
Now we move onto the beak, so we make a box again and change its segments into:
length segs: 4-5, width segs: 4 height segs: 4-5
I must admit my beak didn't turn out anything like the one in the concept picture and I had to redo it because my first attempt didn't look that good. However with the second attempt it turned out great, the shape of the beak is all up to you, if you want to try to make it like the concept picture, a duck kind of beak or a vulture type one, mine turned out like an eagle/vulture kind of thing.

After we had this thing done, I felt it looked awkward so I made a jaw to put under the beak and this should be pretty easy, make a box, with a few segments you decide the amount, and then shape it so that it fits with the beak and doesn't look weird underneath it. Like this:
When you have a nice looking beak it's time to move on towards making the eyes of this beast, we start by making a box like always and placing it where we want the left or right eye to be, my segs are length segments: 5, Width: 5 and Height 1; remember that as we reshaped the beak a little the eyes may not fit very well with the rest of the model so we'll have to use some imagination while shaping the eyes, this is just the first step of making the eyes, here's a screen of the eye I made:

Step two of making our eyes is to construct a kind of frame around this basic eye shape and make it look real good, we start by making a box (again) with L.Seg: 1, Width: 12 and Height 2, we will use this box and kind of wrap it around the eye like a snake around its prey, we edit the vertex and rotate the box slightly to make it look this way.
Once this is done, it'll make it look better when we've snaked this thing around the eyes, now to the shaping of the snake thing (only use the Front view to shape it), make sure you rotate the lines of vertexes so that there's no sharp edges that looks awkward or anything, when you're done this thing should look like a donut around his eye:
Now we will enclose the donut, we do this by first selecting both ends of the donut by using the polygon selection, and then push the delete button on the keyboard. Save often and different names of the model. After this, zoom in the perspective view and and grab a vertex and right-click and then go to 'Target weld' now drag the vertexes onto each other to weld them together and creating a nicely enclosed donut thingy rotate it so that it isn't too far in the air and far away from the head. And after this you should have a nice eye, just clone it and mirror it and then move it to the right place on the opposite side of the head. Also add some pupils to the eyes by using spheres.
And that's it, you're done. As crazy as I am i took the model from Gmax into 3ds max and rendered it wildly and then took a picture and edited the picture with Photoshop and created a nice piece of Wallpaper which you can find here: http://boomerangpython.deviantart.com/art/Birdface-31103893
Hope the Tutorial has been useful and you now have a rough idea of how to make your own models, remember that when you make models for games you need to mind the polycount and try to keep that as low as possible without making the model look all bad.
Good luck and Good modding.
Emperor Protects.
Alright, i wrote this tutorial ages ago, so the english might be a bit rough and the tutorial was originally intended for use with Gmax, but it works just as well for 3d studio max, as a side-note for those using 3ds max you may skip the 1.0 - Program part, hope you learn something from it. Everything that follows from here on is unedited.
---
Introduction
This tutorial was written in a school-project where the students was supposed to learn to plan and work on something by themselves and as I like working with 3D things I decided to make a tutorial for gmax and also 3d studio max 6 for others to read if they want to get into 3D doohicky modelling, when using this tutorial, feel free to go crazy and test things (save first though).
Chapters
1 - Preparations
1.0 - Program
1.1 - Concept art
1.2 - Gmax User Interface
2 - Modelling
2.0 - Feet
2.1 - Legs and Torso
2.2 - Wings
2.3 - Neck and Head
2.4 - Beak and Eyes
1.0 - Preparations - Program
Before you can even think of starting to make any of your fantasies into reality (or well virtual reality..) you'll need a program. The program we'll be working with is Gmax, it's a free stripped down version of 3d studio max that you can download without much problems right here: http://www.turbosquid.com/gmax just click the green 'Download gmax' button up top. When you have the program installed and launch it you will see a window pop up that wants you to insert a registration key, to get one of these which also is free (of course) you will need to go to turbosquid and register a user on their website and then you will be sent the registration key through your e-mail. When you input the key in gmax the program will launch and you will get to choose your prefered graphics settings, when you've done this you are ready to go.
1.1 - Preparations - Concept Art
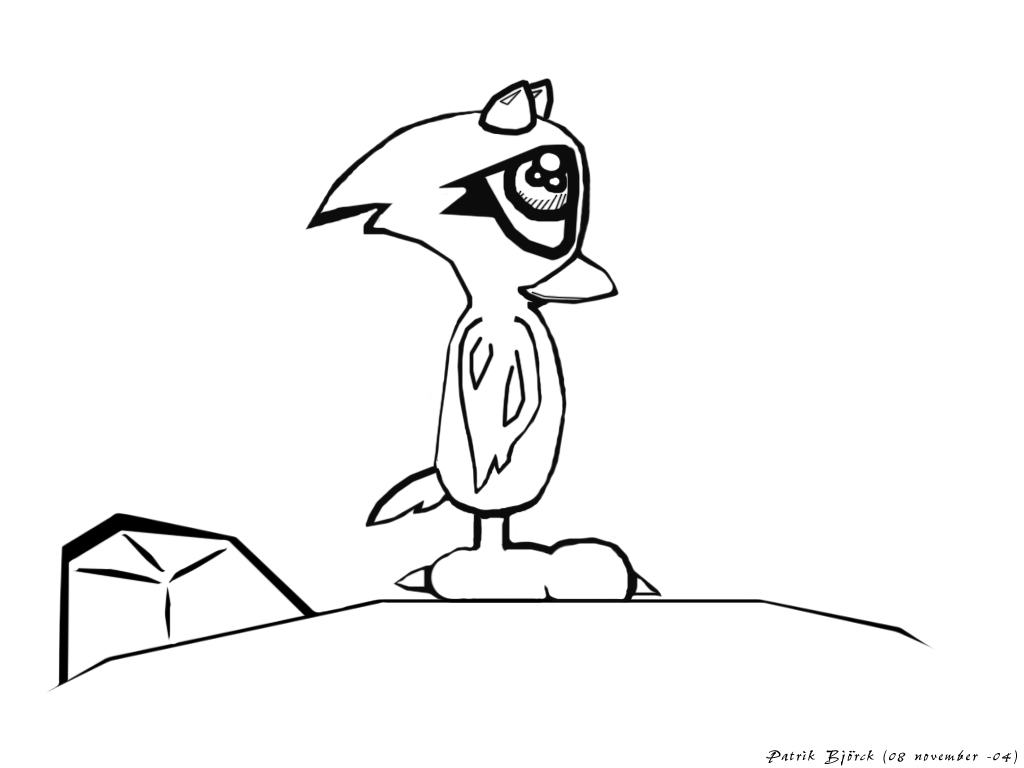
When creating a 3D model the easiest way is to have a reference picture of what you want to make, you can either search the net for a suitable picture or doodle something down on a paper. The more angles the better, I chose to only use one picture because I couldn't really spend any more time on doing another picture as the first one took too long to make. Here's the picture I will be using as reference.
1.2 - Preparations - Gmax/3ds max User Interface
I will go through the most commonly used toolbars and tools here and I'll start with the most basic and most used tools. See this picture.
From left to right, first button is the undo button, no need explaining that and the second one is the redo button doesn't really need any explaining either.
The third and fourth buttons are for when you want to link or unlink your model to a skeleton structure, this is only used when animating the model, so we won't be using these.
Fifth one is the selection tool, with it you can select the model piece in any of the viewports you want to tamper with.
Sixth tool is basically for if you want to select several objects you can hold down the left mouse button and just move the mouse around, with this tool you can change between if you want to have to select the entire object or just part of it to select it.
The seventh tool is for what kind of thing you want to select for instance, if you want to select all model parts and nothing else you'd select 'geometry' from the list and presto, you can now only select models (mesh).
Eighth tool is also a selection tool, basically you just click it and then you can select any part on the model you want from a list.
These last three are the mostly used ones as they involve manipulating the model's size, shape and position.
Ninth tool is the one you use to move things like models and vertices (vertexes).
Number ten is for rotating models and model pieces.
And last but certainly not least we have the resizing tool, with it you can either shrink or enlarge models.
These tools involve moving of the angle you view your model in the different viewports, the first one is the zoom, which zooms (obviously).
The second one is also a zoom, but it zooms all viewports at the same time (quite unnecessary).
The third one is the one you use if you loose track of the model because it basically snaps the camera view back to the model.
Fourth also snaps back to where the model is but with every viewport.
The fifth tool is for zooming in the 3D viewport and for zooming in on the selection you make in the other viewports.
The sixth is for moving the camera angle up and down, right and left or whatever you want.
Seventh is for circling around the model and to get a nice view of it.
Last one makes the viewport you've currently selected extend and cover the other viewports, just click it again if you want it to go back to normal.
2.0 - Modelling - Feet
Right, what we'll begin working on will be the feet, always easy to start with the feet as they most often do not have much details and weird shapes that for instance heads have. I've decided that the bird should have three toes so I'm going to start with the middle one and work from there. First I create a box with 4 length segments and 5 width and height segments. After that I right-click the box and choose
'Convert to:' -> 'Convert to Editable Poly'
A side menu should appear. Now click the first icon from the left (the one with 3 dots) under the text 'Selection'. Should be quite easy to locate.
Now you can see that dots also known as polygons appear on the box in the different viewports. You can now select them and move them as you wish to get the shape of the middle toe bit. This is what mine looks like.

Remember that the toe you are shaping will have one toe on each side so make an area on those sides flat. When you're happy with the shape of your toe go to the side panel to the right, second tab and click the fourth icon from the left which looks like a red square once you've clicked it you should see lines all over the model in the perspective viewport, try clicking on the model. You should see that some of the lines around the spot you clicked turn red, this means you've selected them. The segments of the model are called faces.
So now select a few faces where you think the other toes should start, then go to the menu on the right and scroll down the 'selection' part until you get to the 'Edit Geometry' section here you'll find the 'Extrude' and 'Bevel' tools.
Click the Extrude button and then click and drag the selected area to any side in the viewport. This will simply make a new squareish toe appear do it a few times in the same area so you get a few segments on top of each other to work with. When this is done start shaping the toe, do this on the other side of the foot too.
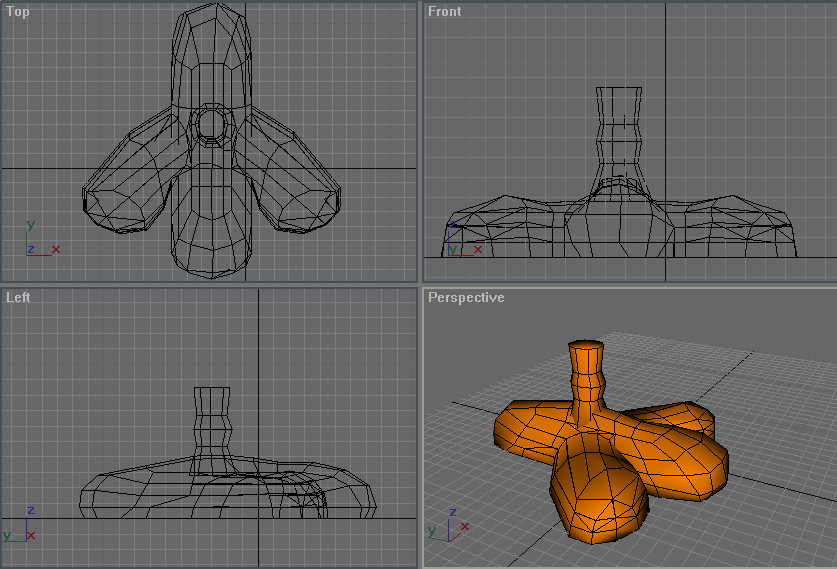
Next step is to make the foot look good, I managed to make my foot look pretty good here's a pic:

And that's the foot done, now to move on to the legs and body. Remember if you forget how to do something you can always go back and read.
2.1 - Modelling - Legs and Torso
Legs are pretty easy to do, just start by going to the 'Create' menu in the top bar and go 'Standard Primitive' and then 'Cylinder', start by putting it at a position you'd like it to be and after that go to the left menu and click the second icon from the left (the blue bent pipe or rainbow shaped thing). Then go and change the 'Sides' into a number between 6-9 if you want, I changed it to 8 and change 'Height segments' to 4-5 I changed this to 5. Now just convert to editable polygon or mesh and start moving the vertexes around to make the leg look somewhat organic. I added a knee to mine by moving a few vertexes further out than the others, like this.
Onwards to the torso, first of all we start by creating a box and changing the 'Length segs' to 6, 'Width segs' to 5 and 'Height segs' to 5. Now we convert into editable polygon and start shaping the model like the concept drawing. Be sure to drag some vertexes far from the rest of the model to resemble feathers. Also make sure it's rounded and that you do not see any hard edges where they shouldn't be.
This is what my torso turned out like.

2.2 - Modelling - Wings
Now we're going to do the wings/arms, again we start by creating a box and changing the segment amounts to something like maybe length segs: 5, width segs: 5 and height to 3. Now we should have a nice box that we can reshape into a fine looking wing. If you haven't already then I advice you to move the box to where the wings should be, on the side of the torso, where his shoulders would be just like in the concept picture.
Now the fun bit starts and the challenge, to shape it into an actual wing instead of a box, feel free to play around with the numbers of segments. This might be a bit tricky so be sure to have a copy of the gmax file so that you can start over again if your first attempt doesn't turn out any good.
I realised that I should have made another concept of the bird but in a frontal view. Anyways, this is what my wing turned out like:

Now that you've made one wing, it's time to do the other, we'll copy the one you just made. Select your new shiny wing and go to Edit and then Clone, a 'clone options' window will now appear and make sure the 'copy' selection is marked, under the text 'Object', click OK (the copy will appear inside the other wing, same size and everything so you may not see it at first).
Now you've cloned your one wing but the copy is the wrong way, keep the wing selected and go to Tools and then Mirror, a mirror window will pop up, make sure that under Mirror Axis that the X is marked ignore the other options. Now you will see that your cloned wing has spun around on the x axis and is now perfectly mirrored
Now we will simply move the mirrored wing so that it is almost exactly on the right height and everything as the other wing.
When you've done this you've got a headless bird.
2.3 - Modelling - Neck and Head
Now we will move on to the neck that the bird will obviously need so that it can have a head.
Right let's start by making a cylinder where the neck should be, about the size you think it should be, Height segs: 4-5, sides: 8-10. Now start shaping it so that it fits in with the upper body, necks can be hard to make look good and realistic but with time you learn how to make nice looking ones.
The head is often the most detailed part of a character, which will make this the biggest challenge yet, time to hit the bricks and get started.
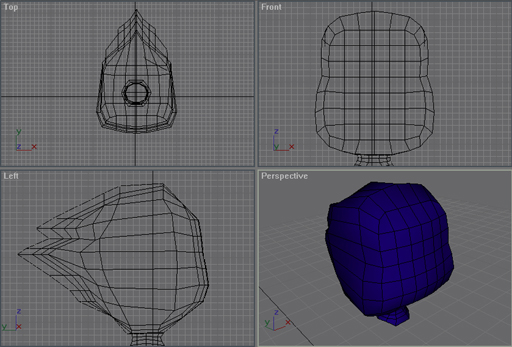
Right, first of all, we start making a box just like we did with the torso,
Let's say length segs: 7-8, width segs: 4-5 height segs: 6-7
After we have made the box (head) really segmented, we will start shaping it to the basic shape that we want, don't try to shape it in the perspective view, so do it in one viewport at a time, left, front, top and if you feel that it will make it easier to see what you're doing, hide the feet and wings or more if you want.
My head turned out quite good, I hope yours did too.
Here's what mine turned out like:

2.4 - Modelling - Beak and Eyes
Now we move onto the beak, so we make a box again and change its segments into:
length segs: 4-5, width segs: 4 height segs: 4-5
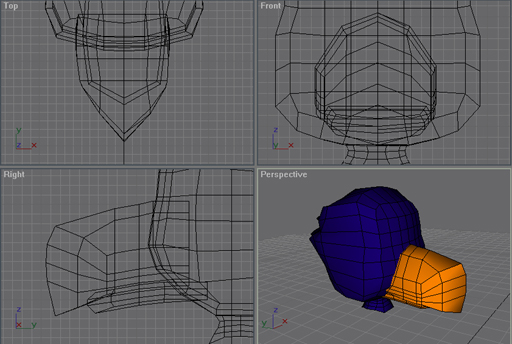
I must admit my beak didn't turn out anything like the one in the concept picture and I had to redo it because my first attempt didn't look that good. However with the second attempt it turned out great, the shape of the beak is all up to you, if you want to try to make it like the concept picture, a duck kind of beak or a vulture type one, mine turned out like an eagle/vulture kind of thing.
After we had this thing done, I felt it looked awkward so I made a jaw to put under the beak and this should be pretty easy, make a box, with a few segments you decide the amount, and then shape it so that it fits with the beak and doesn't look weird underneath it. Like this:

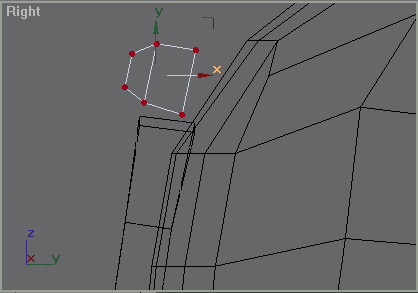
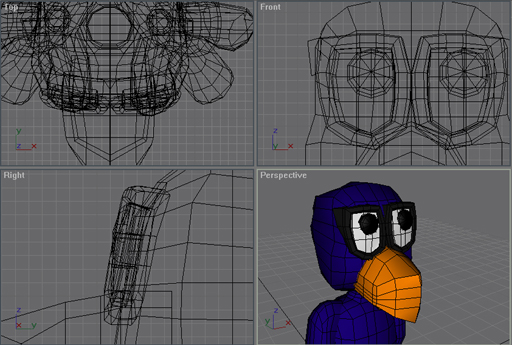
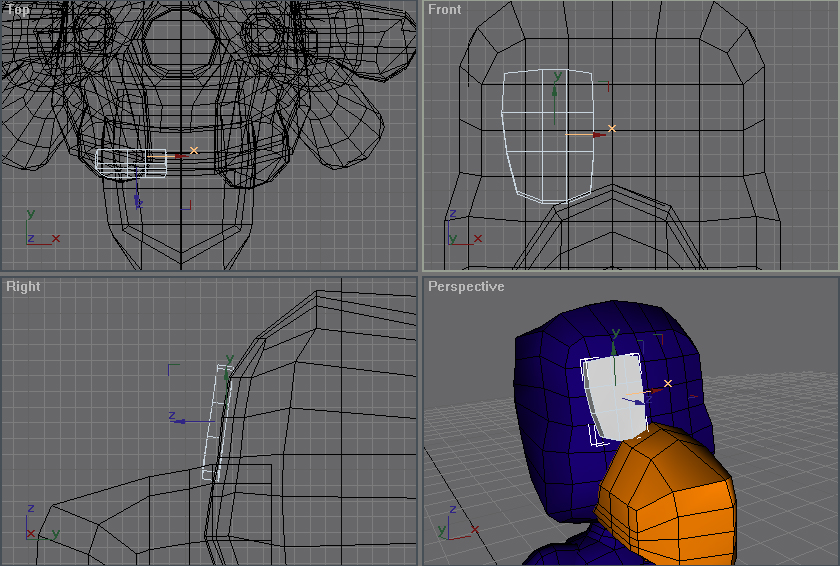
When you have a nice looking beak it's time to move on towards making the eyes of this beast, we start by making a box like always and placing it where we want the left or right eye to be, my segs are length segments: 5, Width: 5 and Height 1; remember that as we reshaped the beak a little the eyes may not fit very well with the rest of the model so we'll have to use some imagination while shaping the eyes, this is just the first step of making the eyes, here's a screen of the eye I made:
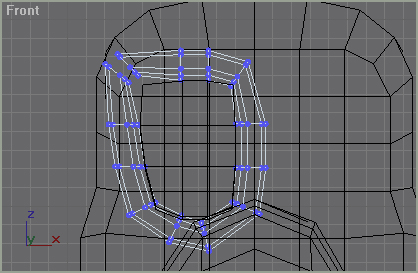
Step two of making our eyes is to construct a kind of frame around this basic eye shape and make it look real good, we start by making a box (again) with L.Seg: 1, Width: 12 and Height 2, we will use this box and kind of wrap it around the eye like a snake around its prey, we edit the vertex and rotate the box slightly to make it look this way.
Once this is done, it'll make it look better when we've snaked this thing around the eyes, now to the shaping of the snake thing (only use the Front view to shape it), make sure you rotate the lines of vertexes so that there's no sharp edges that looks awkward or anything, when you're done this thing should look like a donut around his eye:
Now we will enclose the donut, we do this by first selecting both ends of the donut by using the polygon selection, and then push the delete button on the keyboard. Save often and different names of the model. After this, zoom in the perspective view and and grab a vertex and right-click and then go to 'Target weld' now drag the vertexes onto each other to weld them together and creating a nicely enclosed donut thingy rotate it so that it isn't too far in the air and far away from the head. And after this you should have a nice eye, just clone it and mirror it and then move it to the right place on the opposite side of the head. Also add some pupils to the eyes by using spheres.

And that's it, you're done. As crazy as I am i took the model from Gmax into 3ds max and rendered it wildly and then took a picture and edited the picture with Photoshop and created a nice piece of Wallpaper which you can find here: http://boomerangpython.deviantart.com/art/Birdface-31103893
Hope the Tutorial has been useful and you now have a rough idea of how to make your own models, remember that when you make models for games you need to mind the polycount and try to keep that as low as possible without making the model look all bad.
Good luck and Good modding.
Emperor Protects.