


Using DX9 Shaders
|
|
|
|

Using Direct X 9 Shaders in 3ds Max
This tutorial explains how to setup a DX9 shader so you can export without seeing this:

You need to have installed the 3ds Max plugin for your version as instructed by the documentation that comes with the Mod SDK.
You should read the Mod Creation > Art Assets > Textures page of the documentation so you know what texture images you need.
First of all you need to make sure Max is set to use Direct3D.
To do this go to "Customize" along the top bar (File, Edit, Tools, etc), select "Preferences" and then the "Viewports" tab. At the bottom of this tab is the "Display Drivers" section, you need to check your "Currently Installed Driver" - this can either be Software, OpenGL or Direct3D.
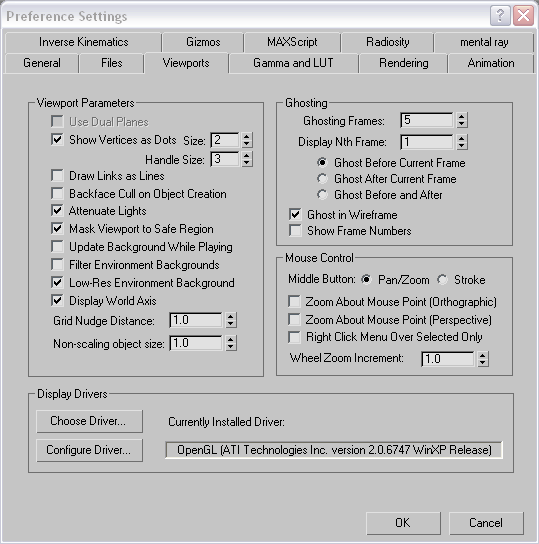
If this is set to Direct3D then you're good to go. If it isn't however you need to click "Choose Driver".
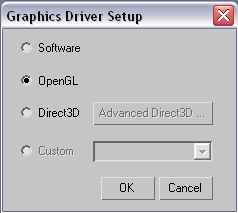
Select "Direct3D", then click the "Advanced Direct3D..." button and make sure you're set to DirectX 9.
Now click "OK" until you've closed all the extra windows. You'll be told that the settings will apply next time you start Max, so close Max and then open it again.
Now onto using the shaders.
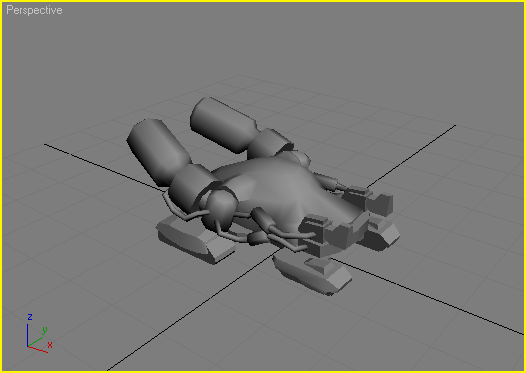
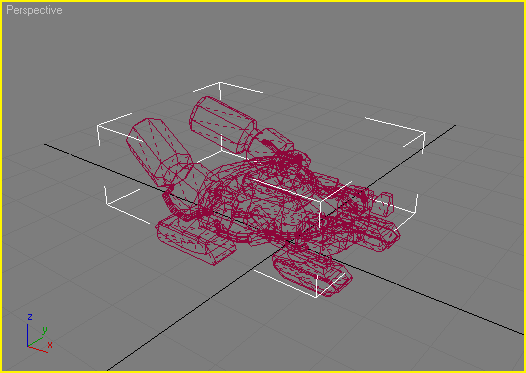
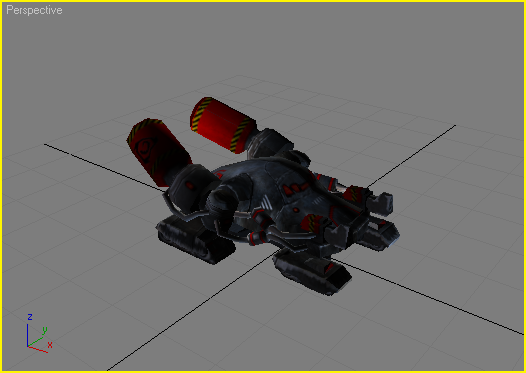
Obviously you need a model, for the tutorial I've assigned the Nod Flame Tank from the sample art files with a blank material to simulate a fresh model. Which looks like this:
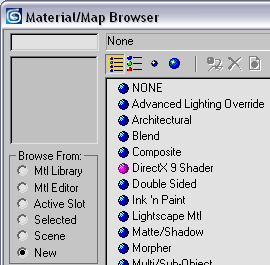
Fire up the Material Editor (press "M") and click the "Get Material" icon. That's the blue sphere with an arrow pointing to it on the left of the window, below the materials grid.

This button launches the "Material/Map Browser", you want to be set to "Browse From:" New. You'll see a "DirectX 9 Shader" option, either double click this and it will be assigned to the first slot in the Material Editor or drag it to the slot you want it to be in.
Assign your new material to your model. At this point your model will turn invisible in any full 3D viewport (unless you have "Edged Faces" on, in which case it will look like a wireframe viewport as below), but this doesn't matter as we're going to change the shader now.
You'll notice the options for your shader material are a bit different to a standard material.
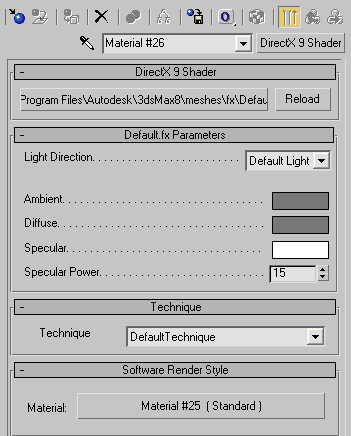
The first thing you want to do is click the button under the "DirectX 9 Shader" rollout, that's the one with the file path in it and the reload button next to it.
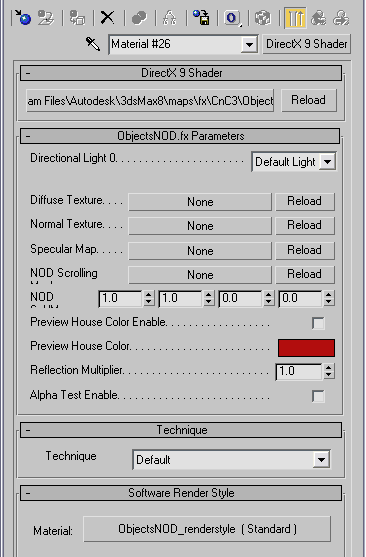
This brings up a file browser, you need to browse to "YOURMAXDIRECTORY/maps/fx/CnC3/". This folder holds the C&C3 shader files as used by EA, you need to select an appropriate one. As I'm using Nod's bringer-of-a-firey-death I'm going to chose "ObjectsNOD.fx". "ObjectsGDI.fx" is almost identical to "ObjectsNOD.fx" but handles house colours differently (Nod's pulse slightly, whereas GDI's are static colours - this is explained in the documentation that comes with the Mod SDK). "ObjectsAlien.fx" is the Scrin version, this has an extra texture for reflections (again this is explained in the documentation that comes with the Mod SDK). The other .fx files have pretty self explainatory filenames and I'm only covering basic unit shaders in this tutorial, they're generally easy to work out though.
Once you've selected your .fx file your material options change to something like this:
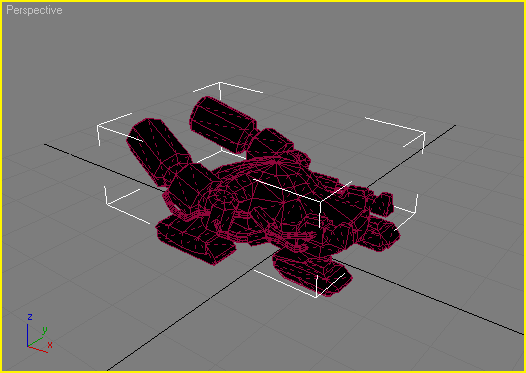
And your model will now look like this in viewport:
At this stage we can start applying textures.
First I'm going to apply a "Diffuse Texture". This is your standard texture image and should look something like this:
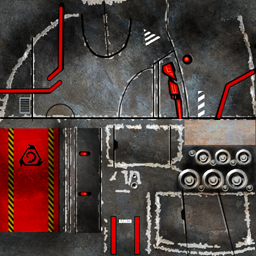
Click the "None" button next to "Diffuse Texture" and a file browser will open, browse to your diffuse texture image and select it. Your model will now look something like this in the viewport:
Now for a "Normal Texture". This is the normal texture image for the game to process depth. It has an _NRM suffix in EA's models and should look something like this:
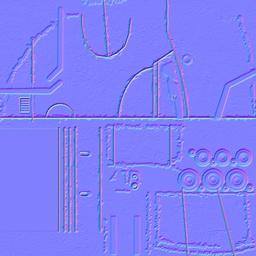
Click the "None" button next to "Normal Texture" and a file browser will open, browse to your normal texture image and select it. Your model will now look something like this in the viewport:

Next is the "Specular Map". This is the specular texture image which is used for a few things (check the SDK documentation). It has an _SPM suffix in EA's models and should look something like this:
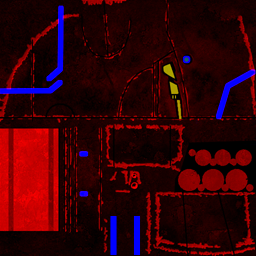
Click the "None" button next to "Specular Map" and a file browser will open, browse to your specular texture image and select it. Your model will now look something like this in the viewport:

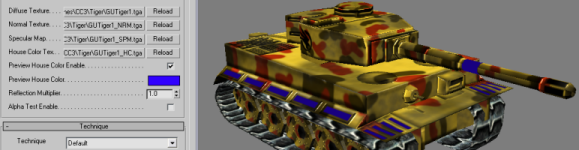
Finally we have the house colour map, or in Nod's case the "NOD Scrolling Map".
It is explained in the SDK documentation that house colours can be shown by the blue channel in the specular map or by a seperate house colour map.
There isn't a seperate map for the Nod Flame Tank but there is one for the GDI Predator Tank and it looks like this:

It should have an alpha channel to mask areas it shouldn't affect (again this is all the SDK documentation).
When applied you can tick the "Preview House Color Enable" box and set a "Preview House Color" to see these house colour areas in the viewport. Like so:
That's shaders covered for standard units, hopefully this tutorial will help people who were struggling to get out of the starting blocks with modelling for C&C3.
Happy modding,
Daz.
This tutorial explains how to setup a DX9 shader so you can export without seeing this:
You need to have installed the 3ds Max plugin for your version as instructed by the documentation that comes with the Mod SDK.
You should read the Mod Creation > Art Assets > Textures page of the documentation so you know what texture images you need.
First of all you need to make sure Max is set to use Direct3D.
To do this go to "Customize" along the top bar (File, Edit, Tools, etc), select "Preferences" and then the "Viewports" tab. At the bottom of this tab is the "Display Drivers" section, you need to check your "Currently Installed Driver" - this can either be Software, OpenGL or Direct3D.
If this is set to Direct3D then you're good to go. If it isn't however you need to click "Choose Driver".
Select "Direct3D", then click the "Advanced Direct3D..." button and make sure you're set to DirectX 9.
Now click "OK" until you've closed all the extra windows. You'll be told that the settings will apply next time you start Max, so close Max and then open it again.
Now onto using the shaders.
Obviously you need a model, for the tutorial I've assigned the Nod Flame Tank from the sample art files with a blank material to simulate a fresh model. Which looks like this:
Fire up the Material Editor (press "M") and click the "Get Material" icon. That's the blue sphere with an arrow pointing to it on the left of the window, below the materials grid.
This button launches the "Material/Map Browser", you want to be set to "Browse From:" New. You'll see a "DirectX 9 Shader" option, either double click this and it will be assigned to the first slot in the Material Editor or drag it to the slot you want it to be in.
Assign your new material to your model. At this point your model will turn invisible in any full 3D viewport (unless you have "Edged Faces" on, in which case it will look like a wireframe viewport as below), but this doesn't matter as we're going to change the shader now.
You'll notice the options for your shader material are a bit different to a standard material.
The first thing you want to do is click the button under the "DirectX 9 Shader" rollout, that's the one with the file path in it and the reload button next to it.
This brings up a file browser, you need to browse to "YOURMAXDIRECTORY/maps/fx/CnC3/". This folder holds the C&C3 shader files as used by EA, you need to select an appropriate one. As I'm using Nod's bringer-of-a-firey-death I'm going to chose "ObjectsNOD.fx". "ObjectsGDI.fx" is almost identical to "ObjectsNOD.fx" but handles house colours differently (Nod's pulse slightly, whereas GDI's are static colours - this is explained in the documentation that comes with the Mod SDK). "ObjectsAlien.fx" is the Scrin version, this has an extra texture for reflections (again this is explained in the documentation that comes with the Mod SDK). The other .fx files have pretty self explainatory filenames and I'm only covering basic unit shaders in this tutorial, they're generally easy to work out though.
Once you've selected your .fx file your material options change to something like this:
And your model will now look like this in viewport:
At this stage we can start applying textures.
First I'm going to apply a "Diffuse Texture". This is your standard texture image and should look something like this:
Click the "None" button next to "Diffuse Texture" and a file browser will open, browse to your diffuse texture image and select it. Your model will now look something like this in the viewport:
Now for a "Normal Texture". This is the normal texture image for the game to process depth. It has an _NRM suffix in EA's models and should look something like this:
Click the "None" button next to "Normal Texture" and a file browser will open, browse to your normal texture image and select it. Your model will now look something like this in the viewport:
Next is the "Specular Map". This is the specular texture image which is used for a few things (check the SDK documentation). It has an _SPM suffix in EA's models and should look something like this:
Click the "None" button next to "Specular Map" and a file browser will open, browse to your specular texture image and select it. Your model will now look something like this in the viewport:
Finally we have the house colour map, or in Nod's case the "NOD Scrolling Map".
It is explained in the SDK documentation that house colours can be shown by the blue channel in the specular map or by a seperate house colour map.
There isn't a seperate map for the Nod Flame Tank but there is one for the GDI Predator Tank and it looks like this:
It should have an alpha channel to mask areas it shouldn't affect (again this is all the SDK documentation).
When applied you can tick the "Preview House Color Enable" box and set a "Preview House Color" to see these house colour areas in the viewport. Like so:
That's shaders covered for standard units, hopefully this tutorial will help people who were struggling to get out of the starting blocks with modelling for C&C3.
Happy modding,
Daz.
Comments
Display order: Newest first
Sûlherokhh - Thursday October 4, 2007 - 10:06
Great! Thank you for taking the time to write this up orderly, understandably and with very good pictures to help along. Good work Daz. Even i learned something from it, and i am a REAL noob when it comes to modeling. :P
Hostile - Saturday September 8, 2007 - 14:44
I don't know about anyone else, but this is seriously good and well written. Thanks abunch for taking the time to write this.